SCANOLOGY has just introduced NimbleTrack Gen2. With upgraded technology, SCANOLOGY's NimbleTrack Gen2 is capable of scanning large and complex areas significantly faster, while maintaining measurement-level accuracy. This is the next generation of the company's mobile optical tracking and 3D scanning systems. SCANOLOGY's NimbleTrack Gen2 is designed to deliver higher performance, especially in speed and measurement range.

A breakthrough opportunity for R&D processes awaits the Vietnamese engineering community. The specialized workshop "Driving Engineering Innovation Through Smart Simulation" organized by ANSYS will take place on October 29, 2025, at the Innovation Hub Building, updating the latest advanced simulation solutions for the manufacturing, electronics design, and Nano-Micro industries.

In the global race to automate manufacturing, China is emerging as a pioneer with the “dark factory” model – where robots and artificial intelligence completely replace humans. Requiring no light or rest, the new generation of factories operate continuously 24/7 with superior precision and efficiency.
Maintaining confidence in laser tracker and laser radar accuracy has taken a significant leap forward with the release of the ISO 10360-10:2021 on August 31 2021.
Maintaining confidence in laser tracker and laser radar accuracy has taken a significant leap forward with the release of the ISO 10360-10:2021 on August 31 2021. The big picture is that this new ISO Standard has been simplified, with a reduced number of required measurements.

More significantly for end-users, Annex E of this new ISO Standard publishes a new field-testing process that will check instrument performance in the field against manufacturers’ specifications. The international acceptance of this new field-testing procedure will help end-users maintain confidence in the measurement accuracy of their critical instruments.
Why is Laser Tracker Interim Testing Important?
Laser trackers and laser radars are mechanical systems that rely on the relative positions of components within the instrument. These sensitive and highly accurate components can be thrown off, creating misalignment and geometric error sources. Shipping an instrument, wear and tear from frequent usage, environmental hardships, multiple end-users, and simply the age of the instrument can create internal misalignments that degrade measurement accuracy and challenge the data integrity of past and future measurements.
Diminished accuracy will not hide forever. When it surfaces, it can become a metrologist’s worst nightmare, leading to unhappy customers, time-consuming research to validate past instrument performance data, re-work driving up both labor and material costs, instrument down-time and, potentially, mission failure. Therefore, maintaining confidence in laser tracker and laser radar performance is critical to metrology professionals in the field.
For years, end-users have pressed for a simple, reliable, and traceable process to field-test their laser trackers and laser radars. NIST first published the IR-8016 procedure in 2014, and the successful application of this comprehensive, volumetric test has proved satisfactory for many in the field, including Lockheed Martin, the U.S. Air Force METCAL Program, Kuka, Futuramic and Models & Tools.
The new ISO 10360-10:2021 interim field test is based on the earlier NIST process, with an 80% overlap between the two procedures. With this minor variation, it is estimated that the new ISO field-testing process, like its predecessor from NIST, can be completed in 30 minutes or less.
KinAiry Test Artifact
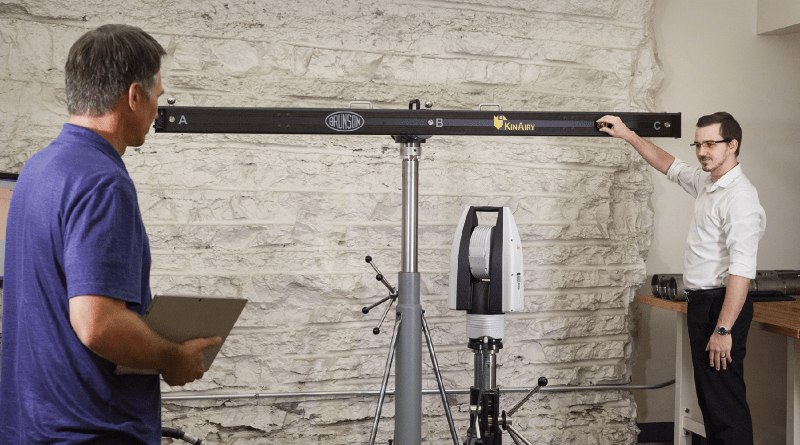
Brunson Instrument Company was approached by NIST, and the organizations collaborated to develop the NIST testing algorithm. The resulting KinAiry solution features hardware custom-designed for the precise requirements of interim field-testing. The three-piece, easily transportable 2.3-meter reference bar is kinematically mounted at its airy points to provide the required stability. KInAiry software guides the user through the process, which results in a graph that portrays tracker conformance to manufacturers’ specifications.

Confidence Maintained
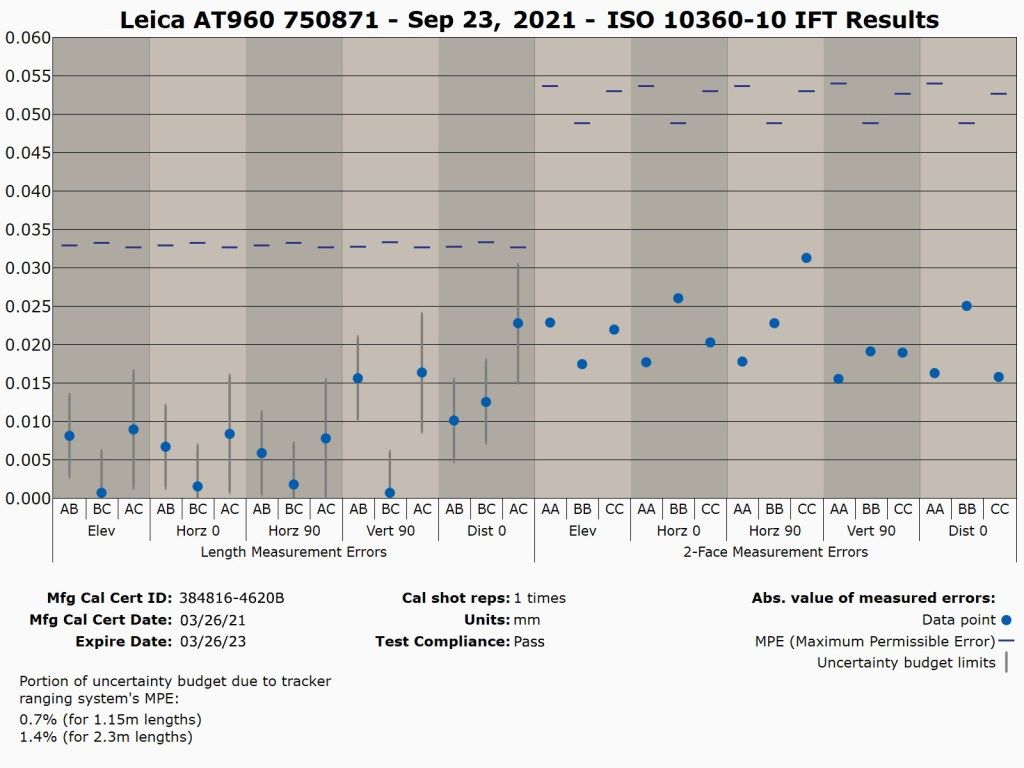
The KinAiry software generates a graph (above) of the ISO 10360-10 field-test results, displaying Length Measurement Errors (left) within a range, indicated in grey, representing the uncertainty associated with each measurement (95% confidence interval.) The 2-Face Measurement Errors are displayed at right. Millimeters are displayed on the Y-axis, and the blue, horizontal bars indicate the manufacturer’s maximum permissible errors. With the comprehensive, volumetric interim test complete, the KinAiry software reports a tracker that is measuring very accurately. Brunson will test this tracker again in October as part of a monthly schedule.
While KinAiry software is currently being adapted to the new ISO field-testing process, the hardware requires no adaptation. Brunson will soon be bringing the updated KinAiry solution to market – applying the new ISO 10360-10 Annex E interim testing process.
“For me it all comes down to the thought of working on a satellite project and learning, after launch, that one of our trackers was out of tolerance when it was used to align hardware on that satellite. I’ve gone through the stress of validating measurements after receiving an Out-of-Tolerance Notification when an instrument was calibrated. The thought of an in-orbit failure due to an errant measurement instrument made me lose sleep before we adopted the KinAiry system. You can’t underestimate the value of maintaining confidence in your tracker,” states a leading aerospace metrologist.
Interim Field-Testing in Application
As a precision manufacturer, Brunson relies on laser trackers for many of its own tight-tolerance measurements, using the KinAiry system to test API, FARO and Hexagon trackers.
Based on its tracker usage, Brunson finds a 30-day interval appropriate for field testing its units. Monthly tests help underscore confidence in tracker performance, while the graphical results from the KinAiry software provide a solid benchmark for tracker performance trends.
“When we observe a measurement point approaching the performance limits across a sequence of test results, we increase the frequency of testing on that particular instrument to weekly. If the tracker’s accuracy diminishes further, we return the instrument to the manufacturer for factory calibration, and the previously recorded data provides a ‘bookend,’ separating the period when the tracker was operating within tolerances, and when the tracker moved outside of tolerance. This can help limit the scope of our research as we assess the impact of the tracker’s diminished accuracy” states Mark Meuret Brunson’s Director of Engineering.

“Of course, our testing frequency is based on Brunson’s particular tolerances and tracker applications. It turns out that other KinAiry users take a similar approach, reporting weekly, monthly, and quarterly testing intervals for their laser tracker or laser radar instruments” further comments Mark.
So when should an end-user run an interim field test? The short answer is every time you need to maintain your confidence, validate the instrument. Other triggering events for field testing include when the instrument is shipped or has travelled to a remote location, before and after a critical measurement sequence, to maintain conformance to a Quality System, and, as described above, to provide a benchmark and bookend for measurement sequences.
ISO Guidelines for Frequency of Interim Field-Testing
Excerpt from the new ISO 10360-10:2021 release:
– Some users with high-value and/or safety-critical workpieces may elect to perform daily tests, while other users will possibly test weekly or monthly.
– The frequency of interim testing is a matter of economics and necessity, i.e. the time period between interim tests should be chosen in a manner that meets the needs of the measurement system user while not compromising the integrity of the measurement tasks performed.
– A laser tracker that is in a stable environment with a single user will typically need interim testing less often than one that is frequently transported, used by multiple operators, or in a harsh environment.
– The frequency of testing is also strongly affected by balancing the cost of interim testing against the consequences of accepting a bad workpiece or rejecting a good one.
– It may be useful to consider the interim testing interval as a percentage of total laser tracker operating hours.
– Interim testing should be conducted after any sort of significant event such as the laser tracker being subject to excessive vibrations or potential damage.
The Future of Interim Laser Tracker Field Testing
With acceptance of an international standard for interim field-testing via the ISO 10360-10:2021, one can expect greater peace of mind in metrology operations across the globe. Confidence in a new interim testing process will do that.
The validation of interim field testing is likely to expand in the near future, as well. ASME’s B89.4.19, with a process identical to the ISO 10360-10:2021 Annex E, appears to be reaching a final review and approval and will soon be published, further expanding support for this new interim field test process.
Read Quality Mastery magazine to get more information about quality management: https://qualitymastery.v-proud.vn/
If you are looking for quality management solutions, visit the following websites: v-proud.vn/product and doluongcongnghiep.vn.
(84) 896 555 247